I have always been lazy about film processing. After learning to develop film the regular way in D76 I found the prospect of babysitting a film development tank to agitate it every minute a bit idiotic. To me it seemed like a waste of time, so I researched stand development. For quite a while I developed all my film in Rodinal with this method, because it allowed me to just leave the tank be for an hour and then only agitate during the fixing stage. Sitting next to a tank for 5 minutes is much less annoying than sitting next to it for 20 minutes or longer. The only problem was that Rodinal isn’t available everywhere, because it’s corrosive and therefore can’t be shipped by air. After quite literally wasting my time with Tetenal Ultrafin for a while I was very happy when I finally found another source of Rodinal. However, after processing many rolls I realised that the stand-development has its downsides too and I never quite managed to defeat the problem of bromide drag entirely. I began experimenting again and tried stand-development in Caffenol-CL which has similar characteristics, but there bromide drag can be handled a little better. Problem solved. For the most part.
However, when I started shooting colour film I realised rather quickly that stand-developing wouldn’t be an option there. Short development times, longer bleach and fix times and suddenly I was sitting next to a development tank for 30 minutes getting more and more frustrated. I had the prospect of having to develop 53 rolls of colour film which meant that I would be sitting next to a tank for 9 hours (!!!) in total. I certainly could think of better ways how I could spend my time than babysitting a developing tank!
The solution to the problem was obvious to me, especially since I have an MSc in robotics: There was a certain need for my own labour to be replaced by the labour of a mindless machine that doesn’t object to doing monkey work. I wasn’t quite sure how I’d go about it yet, but I knew that some kind of robot would be the outcome of my efforts.
Solution 1: Robo, the robotic agitator – stick agitation
My first idea was a very simple one: Many different development tanks come with a little stick with which the core of the tank can be rotated. To automate this movement is rather simple, all it needs is a little servo motor connected to the twiddly stick held in place above the tank and some kind of timed movement of this motor. I had an Arduino microcontroller board lying in a drawer somewhere together with all sorts of little parts, including some LEDs, buttons and by chance a 9g micro servo, which meant that I could test my idea pretty much right away. I put the circuit together and wrote the code, which was incredibly simple. All it does is turn the servo 180 degrees 4 times to make up about 10 seconds of agitation every 30 seconds. It also turns on an LED to show when it’s on. It’s so simple that an 8 year old might be a bit underwhelmed with the difficulty level.
After finishing the circuit and coding the routine in less than an hour I taped the servo to a twiddly stick and tested the controller by merely holding the servo above the dry tank on my desk for testing. So far so easy! However, then I ran into a problem: The real world! I’m not an engineer and I found myself a little confused about what should be the simplest part of it: How was I supposed to hold the thing in place above the tank? In the end the first version of Robo was rather experimental and involved a bent piece of metal that normally holds the antistatic brush for cleaning my records, a plastic box with the Arduino board in it and copious amounts of duct tape. The metal piece by chance had just about the right length to fit my Paterson tank, but there was quite a bit more movement and friction than was good for the little micro servo because the metal piece had too much play. I also had to open the plastic box and connect a battery to start and stop the machine, which isn’t a good idea when your hands are wet. At least as a proof of concept it worked alright though and I even developed a roll of film with this mess.
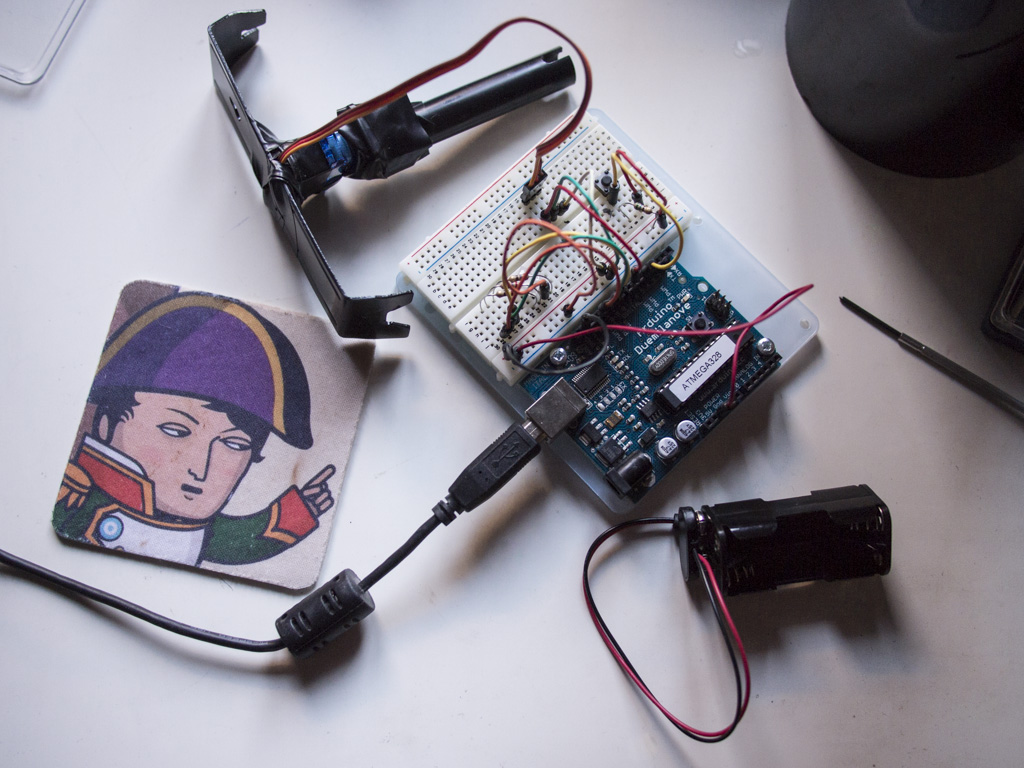
Proof of concept | © Lilly Schwartz 2015
After the proof of concept I started thinking about a less hacked together solution. Of course, solving little engineering problems like that in any more professional way with 3D printing would be complete overkill with the printed parts costing more than all the electronics parts put together. So, I rummaged through my office trying to find a perfect fit for either the AP tank or the Paterson tank that I had at home. In the end I made a rather interesting discovery: A CD spindle turned upside down fits perfectly on a Paterson System 4 tank. Who would have thought?
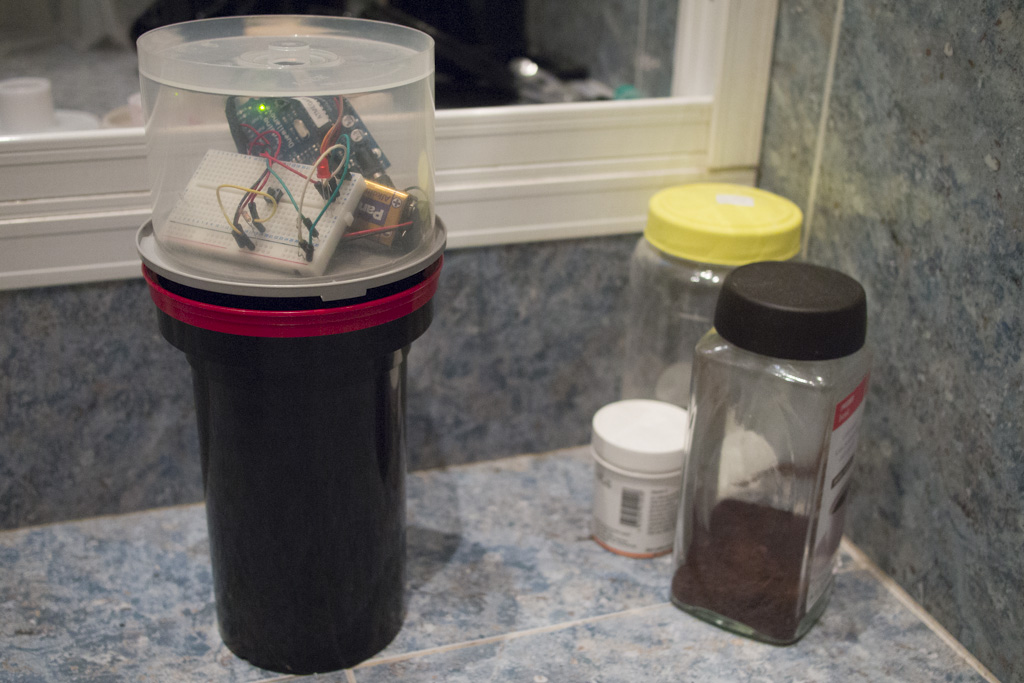
Prototype in action with some Caffenol | © Lilly Schwartz 2015
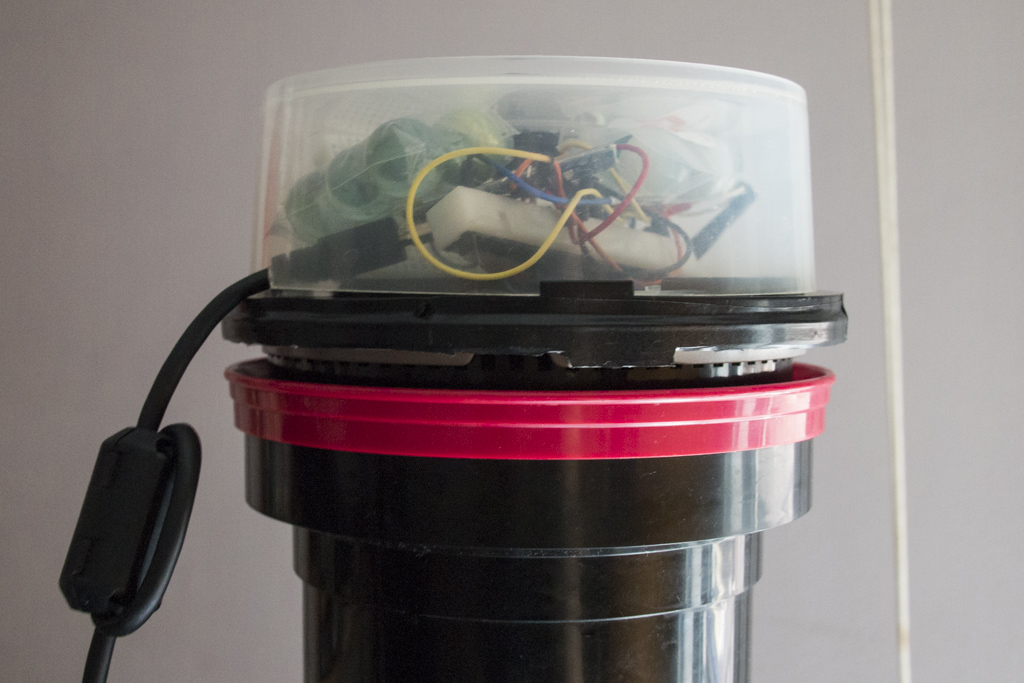
Of course with the CD spindle upside down the lid doesn’t close, so it needs two spindles and one lid to make the enclosure. I removed the core from both spindles with a knife, which gave me a hole to extend to fit the servo motor in the right spot. One hole I only needed to extend slightly to fit the bottom of the servo motor, but the second spindle needed a slightly bigger hole so that the rest of the servo would fit in. After fitting the servo I finally connected both spindles together with – you guessed right – more duct tape and the enclosure was almost finished. The only thing missing was an easily accessible off switch. I fit the switch in the centre of the lid, changed the code to react to the switch and I was done. The solution is in fact rather nice, because I could even make the enclosure bigger or smaller with differently sized lids. First I used the lid of a 50 CD spindle that could handle a breadboard and a full-size arduino board. Later I got myself an arduino nano board and managed to fit it all in a lid for 20 CDs. And since there was still space in the enclosure I even weighed it down a little with some glass marbles, so that the contraption wouldn’t move too much on top of the tank. In the final version I also used a USB cable with a standard USB charger to power it, because I didn’t want to run out of battery mid roll.
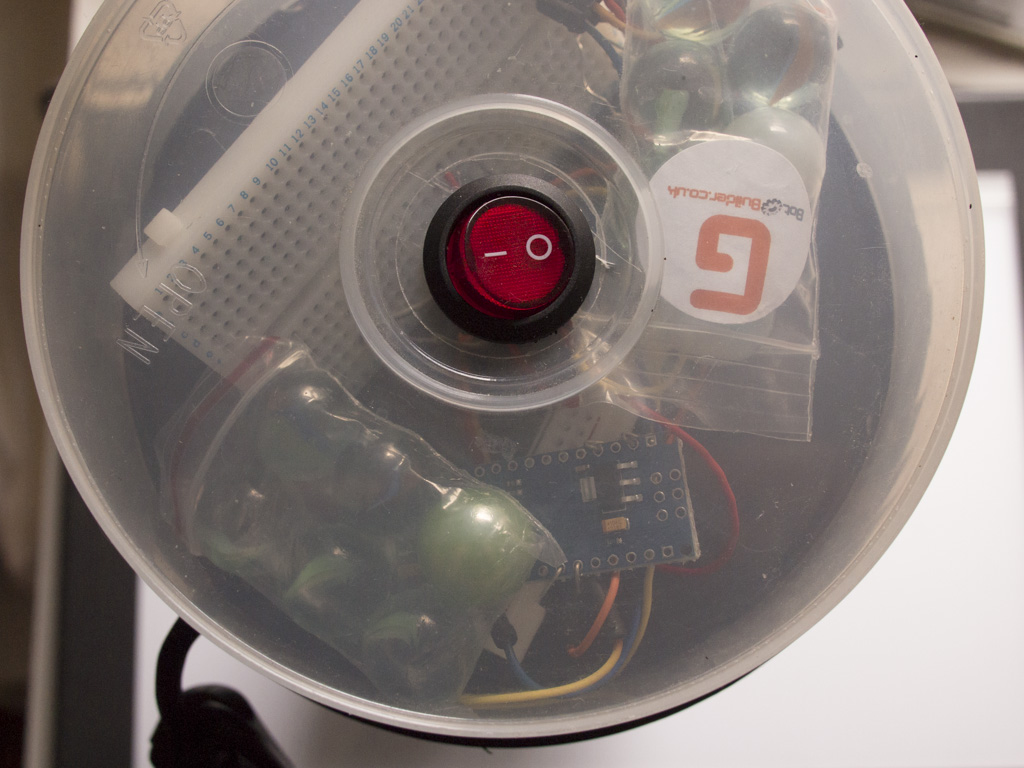
Enclosure viewed from above | © Lilly Schwartz 2015
After making the perfect enclosure I obviously also needed a better way of connecting the twiddly stick to the servo. After thinking more about 3D printing I decided to go the LOFI way again and pulled out the secret weapon in this plot: FIMO clay. This is a sort of modelling clay that you can form into any shape you like and then harden in the oven. And no, I didn’t need to order it, it’s the kind of thing any reasonably crazy person (or parent) might have lying around in a drawer somewhere for no particular reason at all. I put quite a thick layer of this stuff around a circular plastic servo connector that is normally screwed to the servo itself and pushed the end of the twiddly stick into the layer to make a mould. The idea was that this way the servo connector had a grip on the twiddly stick and it actually worked perfectly! The plastic of the servo connector didn’t even deform at the temperature at which the FIMO clay hardens and my custom made servo-twiddly stick-connector could be screwed to the servo like any other connector. The fit with the twiddly stick didn’t turn out extremely tight, so it can fall off if you’re not careful, but it works surprisingly well for such a kindergarten solution. If I don’t mind losing a twiddly stick the FIMO mould also provides enough surface area to use superglue for a permanent connection.
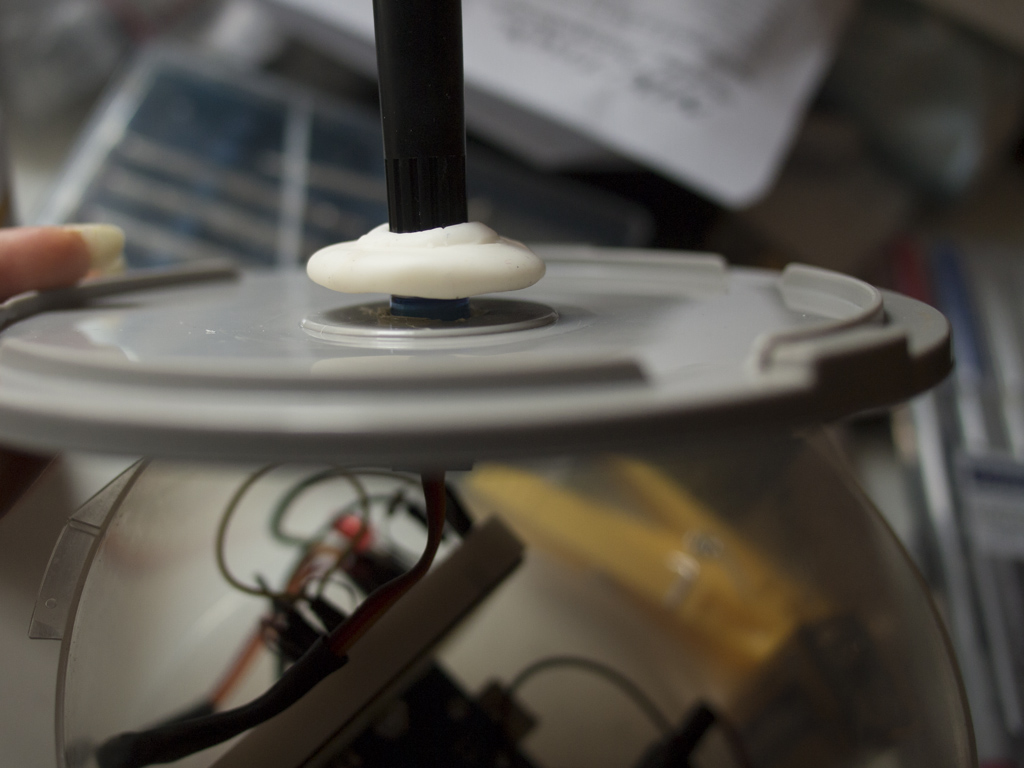
FIMO servo connector | © Lilly Schwartz 2015
To sum it up, the parts needed are:
- Paterson System 4 tank + twiddly stick
- arduino board
- breadboard
- jumper wires
- 1 switch/button
- 1 LED
- micro servo 9g and servo connectors
- 2 CD spindles and lids
- FIMO modelling clay
- sharp knife
- duct tape (!!!)
In total the price comes to about 10-15€ and even less if you order the parts from China. This all might sound a little difficult and I quickly glossed over the part where I put together the circuit and wrote the code, but believe me, with 3 arduino beginner tutorials you’re already beyond what is needed for this little project. All you need to figure out is a little servo control, turning on an LED and how to handle a button. As I said, any 8 year old could figure it out easily (and they might be able to help you out with the FIMO clay too).
Final version on top of a Paterson System 4 tank | © Lilly Schwartz 2015
Does it work? Yes! Robo has so far developed several batches of black and white film in Caffenol-CH and Caffenol-CM, as well as helped with the fixing and blixing of 40 rolls in total. With black and white development it’s especially handy for T-Max film which needs very long fixing times. Other than that it should work with any developer that doesn’t react badly to stick agitation. With some developers you might see edge overdevelopment or uneven development with this method, but if you use the twiddly stick to agitate anyway, then there is no reason why this shouldn’t work with your developer. If you invert normally, then you might have to try different developers until you find one that plays nicely with the stick. D76 is probably a good starting point. For me this solves mainly the fixing stage: with stand-development I now don’t have to babysit the tank at any point during the process, because the 5 minutes that I spent with the tank fixing are now done by Robo.
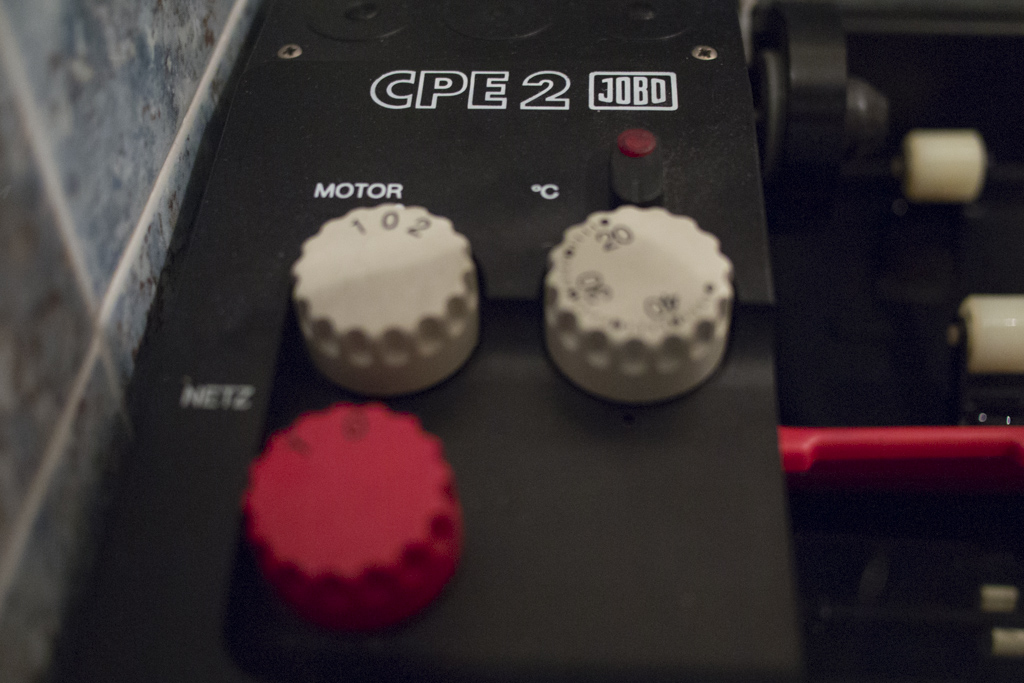
Solution 2: Rotary processing / Jobo CPE-2
After finishing my little agitation robot and developing a few rolls of film in Caffenol it was clear that it worked rather well with any developer that didn’t object to twiddly stick agitation. There are quite a number of developers that don’t quite like it though and among them were also the C41 chemicals that I had at home. In fact they didn’t seem to work for hand processing at all which meant that my little Robo didn’t really solve the problem I set out to solve. A shame really because it would have been a workable solution for the Tetenal C41 chemicals. They seem much less sensitive to agitation.
So, my next idea to cope with those 53 rolls was to build myself a DIY rotary processor for C41 film. The small commercial variant, the Jobo CPE-2 isn’t extremely expensive second hand, but I thought I might be able to save a bit of money if I could build a comparable machine myself. The idea went like this: All it needs is a tempered water bath that can be brought to 38°C, and a way of turning the whole tank in a rotary fashion. The water bath is not that difficult to solve at all if you manage to get an aquarium heater with a (possibly separate) controller that can be adjusted beyond the typical 34°C. You can also build the temperature controller yourself with an arduino, a thermistor (a cheap temperature sensor) and a radio transmitter that turns a radio controlled power socket on and off. The price for the parts is about the same as a Novatronic heater though, so you only save money if your tropical fish died recently. The part that was the most problematic was how to combine the rotary action with the rest though. None of my development tanks were really meant for rotary processing and all of them leaked quite substantially. Jobo tanks which are meant for rotary processing are probably the most expensive tanks out there. Add to this the heater and controller, the bigger motor, another arduino plus enclosure, the rollers, maybe a magnet and assorted equipment to put all this stuff together and you already come quite close to the price of a used Jobo CPE-2, if you’re lucky. Before my plans came to any conclusion about the rotary action I managed to find a second hand CPE-2 quite cheaply and saved myself a bit of headache over the DIY solution. However, other people have successfully built DIY rotary processors. All it needs is a medium sized motor – for example a windshield wiper motor and a way of reversing the polarity of the motor in a timed fashion. It’s a little more involved than the stick agitator, but far from rocket science.
© Lilly Schwartz 2015
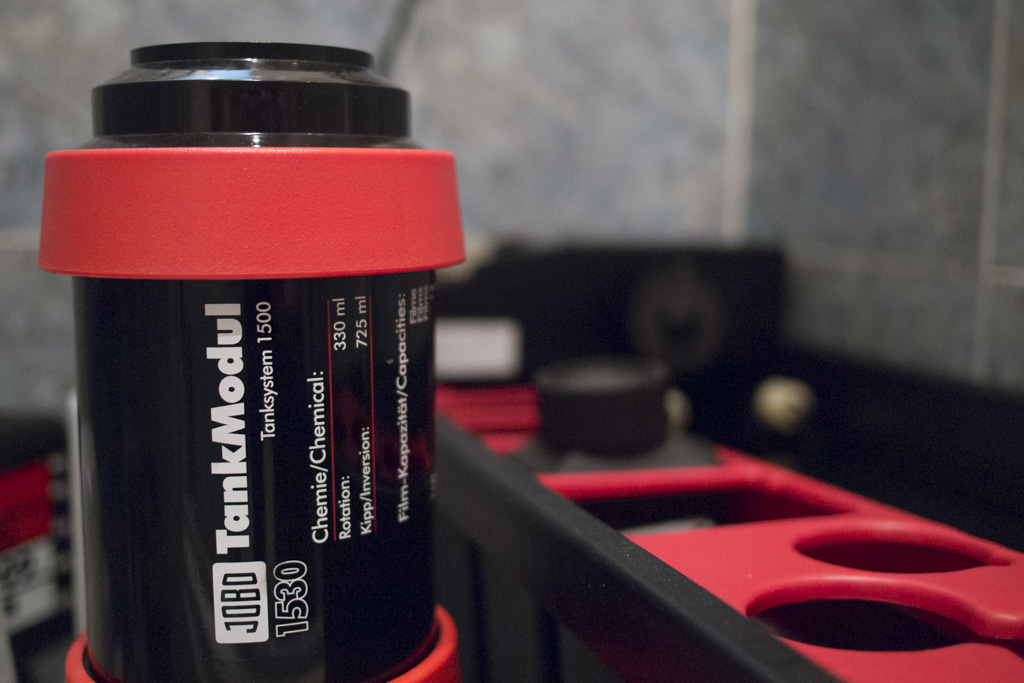
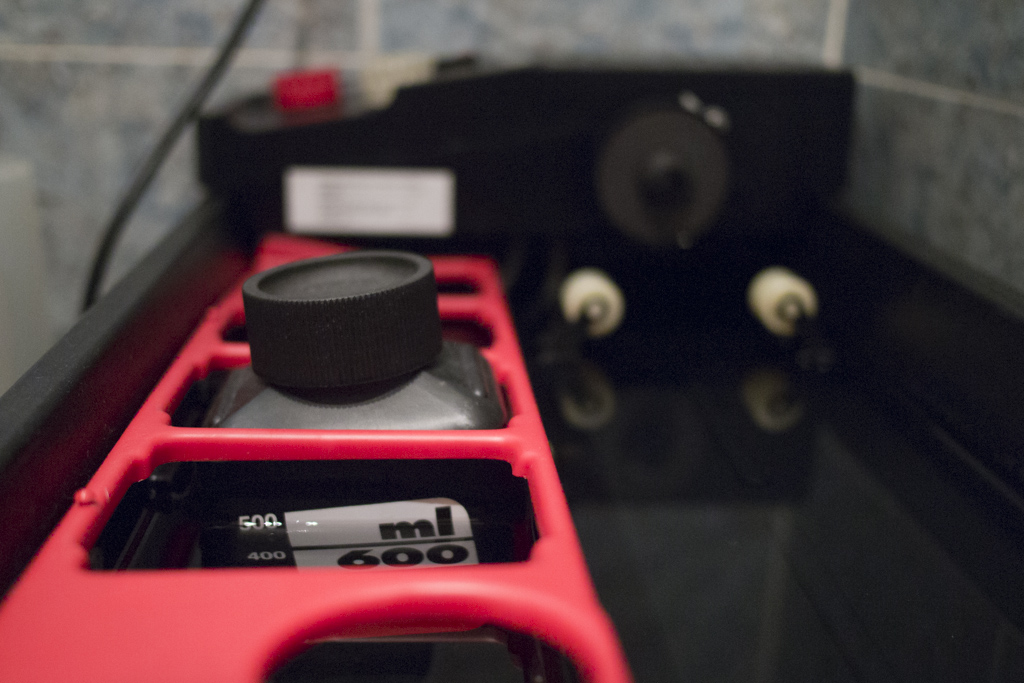
The CPE-2 is precisely the machine I just described – a water bath and a motor which connects to Jobo tanks via a magnet. It can be used for C41, E6 and also black and white processing. C41 and E6 is very straight forward: Just let the chemicals get to the right temperature, process according to the instructions and all of your chemicals will be at the optimal temperature. Use the faster motor speed and the continuous rotary action does the rest for you while you can go do something else. Of course you still have to look at the timer yourself and change the chemicals at the right time, but that’s no problem at all. If you manage to get a lift with the CPE-2 then changing the chemicals is a little easier, but even without it, it’s all really simple. By the way, when you develop C41, I suggest that you add a 30 second wash between developer and bleach/blix or the leftover developer in the tank might react with the bleach and send your lid flying off. So far I have developed only a few rolls of C41 with the CPE-2, but despite my obstinate Fuji chemicals even rolls with sky in every picture turned out perfectly. Problem solved entirely!
© Lilly Schwartz 2015
Although for someone coming from stand-development continuous agitation for black and white seems odd – it’s the opposite, really -, the CPE-2 can also be used for black and white development at the slower motor speed. Not all developers are the best choice for this, but it works even if it’s not the best fit. The first black and white roll I developed in my CPE-2 was a roll of RPX 400 in Rodinal 1:25 which would be rather grainy even under normal intermittent agitation. After all Rodinal has a reputation for grain like gravel! However, since it was 120 I didn’t have to worry so much about grain and I was quite pleased with the results, especially since I was sitting on the sofa doing something else, both during the developing and the fixing stage. Better developer choices for the CPE-2 are supposedly Xtol, HC-110 or D76. There is one thing you need to keep in mind when you develop black and white in the CPE-2: With the small amounts of chemicals needed for rotary processing – only 260ml for a 2reel tank, 600ml for a 5reel tank – you always need to make sure you use enough developer. This can cause problems with higher dilutions if you want to use the tank to capacity. For Rodinal you need at least 3.5ml per roll, which means that you could only develop 2 rolls in a 2reel tank with a dilution of 1:25. With 1:50 there would only be 5.2ml of Rodinal in the tank which would not be enough to develop 2 rolls. Xtol specifies 100ml of stock as a minimum, so this means that you will only be able to develop 1 roll in a 2 reel tank if you develop at 1:1 dilution. The most efficient solution for time might therefore not be the most efficient for the amount of developer used.
© Lilly Schwartz 2015
By the way, if you only want to do rotary black and white processing, then the CPE-2 might not be the best option for you unless you desperately need a water bath in your surroundings to keep 20°C for 15-20 min. If you don’t need a water bath then you can instead get a motor roller base for print processing that were produced by different companies. One example would be the Unicolor uniroller 352 which can be found comparatively cheaply second hand if you’re in the US.
Solution 3: TAS – inversion processing
The third and most difficult solution automates inversion processing. Due to the amount of chemicals and therefore weight involved this would need a rather strong motor, a gripping mechanism that holds the tank in place safely and it would probably also need quite a bit of engineering to balance out the forces created by starting and stopping the motor with liquid involved. It would also need a substantial bit of programming to get the interface right unless you want it to only have one speed. It has been done before as a DIY project by a very skilled person, but I think it’s one of those projects that kind of defeat the purpose of saving time with automation. The amount of knowledge, research and work involved in something like this seems to me to go beyond a little weekend project. However, it’s probably quite a bit more interesting to build something like this than to spend the same amount of time sitting next to a development tank.
But of course if someone has done it before, you can also just throw some money at the problem and get yourself a Heiland Electronics TAS processor, which seems to be quite the dream machine. It fits all sorts of tanks, rotates AND inverts to promise perfect chemical displacement, fully programmable, presets can be saved and so on. Basically the ultimate machine for anyone developing a lot of black and white film. However, as can be expected with such a sophisticated piece of engineering it’s also really expensive – roughly the price of having 180 rolls developed by a pro-lab. If you’re interested in seeing this dream machine in action then you can watch a rather informative video about the TAS in Russian (You can guess what it’s all about without understanding a word). Most people will probably find the price of this machine rather mad when the same can be had by a monkey inverting the tank by hand, but it always depends on how much film you intend to process, how much you value your time and how important perfectly repeatable results are for you. The obvious advantage of this way of automating black and white development is that you don’t have to pick your developer to fit the machine you’re using. With this machine you can use any developer that you can also use for hand development.
Conclusions
As you have seen there are a number of options to minimise the monkey work involved in film processing, the simplest, cheapest and most geeky being the automation of stick agitation. With the programming skills of an 8year old you can at least minimise the time that you spend on fixing and with certain developers you can even automate the whole process. It should work fine with any process that uses the stick agitation method anyway and this includes developing C41 film in the liquid Tetenal C41 Kit. However, the Jobo CPE-2 for rotary processing or one of its bigger brothers CPA or CPP remain the best method for automating colour film development, not only because C41 film is meant to be continuously agitated anyway, but also because the processor already comes with a tempering bath. Second hand prices nowadays make a comparable DIY solution barely viable unless you already have most of the parts at home. And although the complete automation of black and white development requires sophisticated engineering skills or with the TAS a whole lot of money it can also be done easily and economically via a motor roller base if you don’t mind making compromises on the developers you can use. Of course you might say that all of this automation takes all the fun out of the magic of film processing, but to be honest after developing more than 250 rolls of film I have to say that the magic actually involves quite a bit of boring drudgery! I for one don’t mind it at all if a robot does all my monkey work. In fact, I think it’s actually rather cool, especially having built the robot myself!
Brilliant !
Hah, thanks Micke 🙂
That all looks great.
Thanks Julia 🙂
ah ah that’s great! Now I know what to do with my Raspberry Pi
Best and hat’s off for your pics!
Thanks Walker! Raspberry Pi is a little overkill for this, but knock yourself out 😀 I used an arduino nano in the end. Super small and does everything this thing needs 🙂